

 Keeping your Bobcat equipment running at the correct operating temperature isn't just about comfort—it's about protecting your engine from serious damage. The thermostat is a small but critical part that regulates coolant flow through your cooling system, and when it fails, the consequences range from poor fuel economy to catastrophic engine failure.
This guide walks you through everything you need to know about bobcat thermostat replacement, from identifying the right part number for your machine to completing the job and verifying proper operation.
Key Takeaways
- Most modern Bobcat engines use a 71°C / 160°F thermostat (e.g., part 6653948), and confirming compatibility by model and serial number is mandatory before ordering to ensure you get the right part.
- A failing thermostat can cause both overheating and engines running too cool, leading to power loss, excess fuel use, and potential engine damage that can cost $5,000 or more to repair.
- The core replacement steps involve draining coolant below the thermostat level, removing the housing, cleaning gasket surfaces, installing the new thermostat in correct orientation, torquing the housing, refilling and bleeding the system, then verifying temp and checking for leaks.
- Poor cooling can also stem from blocked radiator fins, internal radiator corrosion, or faulty gauge/sensor issues--not just the thermostat itself.
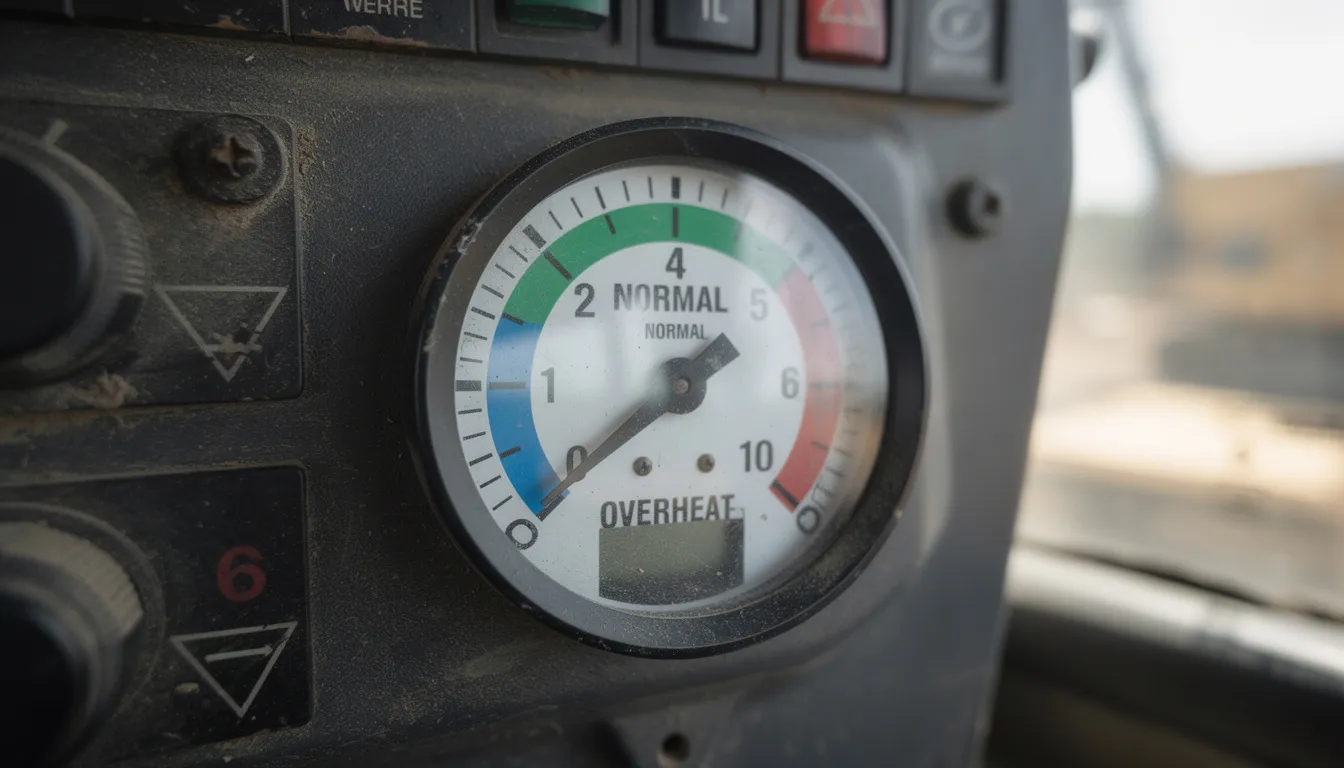
- If your temperature gauge reads abnormally hot, stop operating the machine immediately and inspect the cooling system before further use.
Understanding Bobcat Thermostats and Common Part Numbers
The thermostat in your Bobcat machine functions as a temperature-sensitive valve that controls coolant circulation between the engine and radiator. When the engine is cold, the thermostat remains close to block coolant flow through the radiator, allowing the engine to reach operating temperature quickly. Once the coolant reaches the rated temp—typically 71°C (160°F) for most Bobcat diesels—the thermostat opens to allow circulation and prevent overheating. This 160°F opening temperature is critical for diesel efficiency and longevity, as it ensures proper fuel combustion and minimizes wear.
Here are the key Bobcat thermostat part numbers you should know:
|
Part Number |
Temperature Rating |
Common Applications |
|---|---|---|
|
6653948 |
71°C / 160°F |
Primary focus—skid steers, CTLs, compact excavators |
|
6674172 |
71°C / 160°F |
Superseding number for some applications |
|
6630184 |
Varies |
Older model applications |
The 6653948 thermostat is commonly used across skid steer loaders, compact track loaders, compact excavators, backhoe loaders, and Toolcat utility work machines built during the 2000s and 2010s. Many aftermarket units are sold as cross-replacements for these numbers, but always verify compatibility before making a purchase. Model compatibility can vary, so be sure to review the product details for each thermostat to confirm it matches your specific Bobcat model.
Thermostats are typically installed in a water flange housing at the engine outlet, sealed by either a flat paper gasket or a molded rubber O-ring depending on your exact model and production year. Engine families such as Bobcat D22, D24, and various Kubota-powered units in older models may share thermostat specs, but always require verification via your machine’s serial number or model to avoid mismatch issues.
Compatible Bobcat Models and Serial Number Checks
Many Bobcat machines share the same thermostat specification, but small housing or gasket differences can exist across serial number breaks. What fits one S150 may not fit another from a different production run, making verification essential before ordering parts online.
Here are example models that commonly use a 71°C / 160°F thermostat:
- 225 and 231 mini-excavators from the late 1990s
- 325 compact excavators
- Mid-2000s S150 skid steer loaders
-
Early T190 compact track loaders
- Toolcat 5600/5610 utility machines (approximately 2010–2016)
- Select backhoe loader models
For reference, model compatibility for the most common Bobcat thermostat part numbers is as follows:
- Thermostat 6653948 model compatibility: Bobcat models 225, 231, 325, 328, 331, 334, 337, 341, 425, 428, 463, 553, 753, 763, 773, 7753, S150, S160, S175, S185, and T190.
- Thermostat 6631692 model compatibility: Bobcat Skid Steer Loader models 843, 853, and 1213.
A single part like 6653948 can appear across multiple machine types, and cross-compatibility is common but never guaranteed. The first thing you need to do before ordering is locate your machine’s model and serial number plate. On a skid steer or compact track loader, this is typically found in the cab door frame. On some excavators, check under the left side access panel.
To find the right part:
- Record your exact model (S150, T190, 325, Toolcat 5600, etc.)
- Write down the complete serial number
- Visit the Bobcat Online Parts Catalog
- Enter your serial number to pull up model-specific parts lists
- Match both the thermostat part number and any associated housing gasket or O-ring
This process takes just a few minutes and can save you the frustration of ordering the wrong item and dealing with delivery delays when your machine is down.
Symptoms of a Failing Thermostat or Cooling System Issues
An incorrect or sticking thermostat is only one of several causes of abnormal engine temperature. Before you replace the thermostat, take time to understand whether the problem truly lies there or elsewhere in the cooling circuit.
Signs of a Stuck-Closed Thermostat
When a thermostat fails in the closed position, coolant cannot circulate to the radiator, causing rapid overheating:
- Temperature gauge climbs rapidly into the red zone within minutes of startup
- Coolant boiling or bubbling in the reservoir
- Upper radiator hose feels extremely hot while lower hose stays cool
- Steam or coolant smell from the engine compartment
- Overheating warning light illuminates
Signs of a Stuck-Open Thermostat
A thermostat stuck open creates the opposite problem—the engine never reaches proper operating temperature:
- Engine never warms to normal operating range even after extended running
- Cab heater blows lukewarm or cold air in winter
- Poor fuel economy and reduced power
- White vapor from the exhaust on cool mornings that persists after warm-up
- Temperature gauge needle stays in the low range
Non-Thermostat Causes of Overheating
Before you blame the thermostat, check these other potential issues:
- Blocked radiator fins clogged with chaff, dirt, or debris
- Slipping or damaged fan belt
- Failed fan clutch (if equipped)
- Low coolant level from leaks at hose connections, gasket, or water pump
- Internal radiator corrosion restricting flow
- Faulty temperature gauge or sender unit giving false readings
Warning: If your gauge spikes or warning lights appear, shut down the machine immediately. Do not continue to work the equipment under load until you've identified and corrected the cooling issue.
Pre-Replacement Preparation: Safety, Tools & Coolant Draining
Before beginning any work on the cooling system, ensure the engine is completely cooled. Bobcat cooling systems are pressurized and can cause severe scalding burns if opened while hot. Never remove the radiator cap from a hot engine.
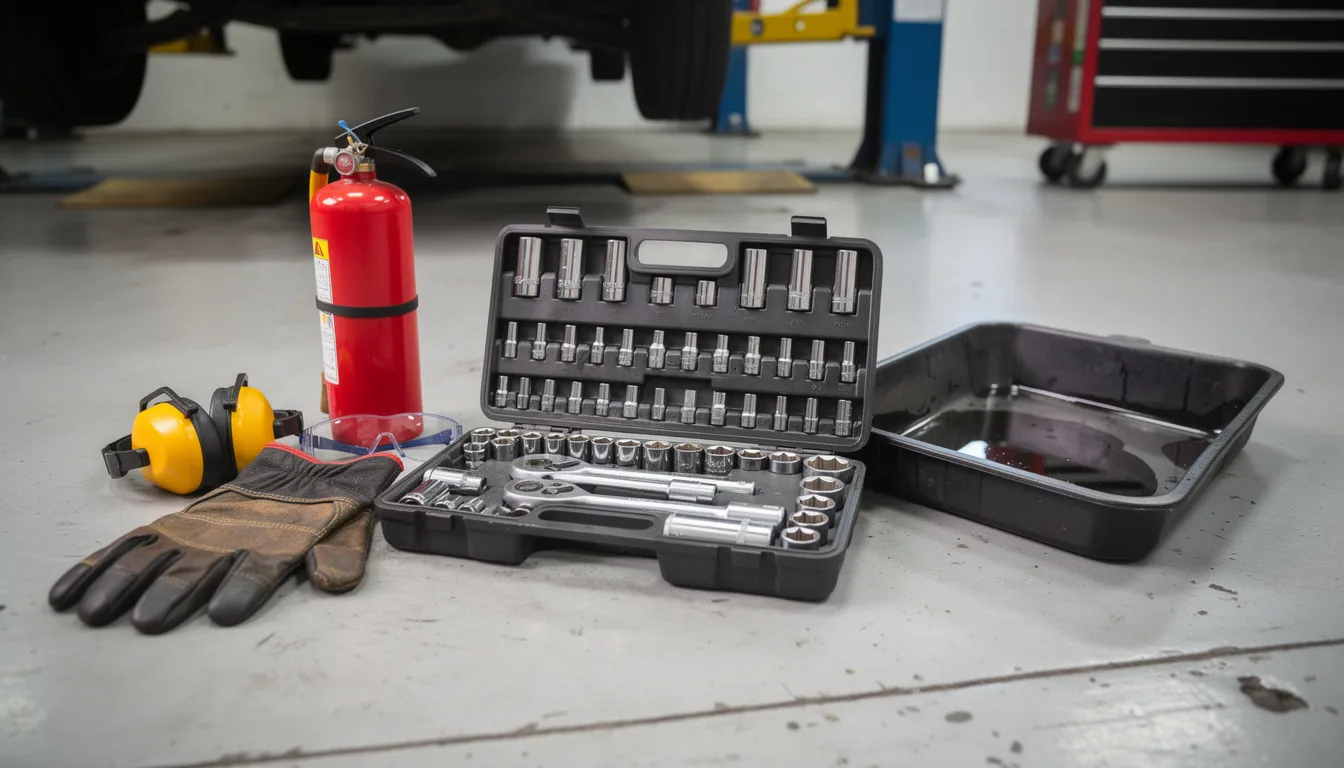
Required Tools and Supplies
- Gather these items before starting:
- Metric socket and wrench set (12mm and 13mm are most common for housing bolts)
- Torque wrench
- Drain pan capable of holding at least 5 gallons
- Clean shop rags
- Plastic or brass scraper for gasket removal
- Channel lock pliers for hose clamps
- New coolant compatible with Bobcat specifications
- Replacement gasket or O-ring (match to your specific model)
- Safety glasses and chemical-resistant gloves
Safety Setup
- Park the machine on a level surface
- Set the parking brake
- Lower all implements to the ground
- Shut off the engine and remove the key
- Allow the engine to cool completely (at least 2 hours, or overnight)
- Put on gloves and eye protection
Draining the Coolant
For a quick thermostat swap, you only need to drain coolant below the thermostat housing level—not the entire system. Locate the radiator drain cock (petcock valve) typically found under the oil filter area on the right side, or disconnect the lower radiator hose using channel locks on the clamp.
Open the radiator cap to accelerate drainage, and collect the coolant in your drain pan. On machines like the T770, operators report draining 1-2 gallons even for a partial drain, so have adequate container capacity ready.
You can reuse captured coolant only if it's within its service life and free of corrosion, debris, or contamination. Old thermostat replacement combined with contaminated coolant is a good opportunity to do a complete system flush. Dispose of old coolant according to local environmental regulations—ethylene glycol is toxic and requires proper hazmat handling.
Step-by-Step Bobcat Thermostat Replacement Procedure
Exact bolt sizes and housing configurations vary by model, but the general sequence is similar across 2016 Bobcat Toolcat units, S150/T190 loaders, T870 loaders, and many compact excavators. Always review your machine's service manual for model-specific instructions.
Step 1: Access the Thermostat Housing
On a skid steer or compact track loader, open the rear engine door or remove necessary panels to access the engine compartment. On a Toolcat or excavator, lift the side hood and panels. Identify the water outlet housing at the top front of the engine where the upper radiator hose attaches—this is where your thermostat lives.
Step 2: Remove the Housing
Loosen and remove the upper radiator hose from the housing if it's in the way. Then remove the housing bolts evenly. Most T-series machines use 12mm or 13mm bolts—typically two bolts on T190 and 463 models, three bolts on T770 units. Note bolt length and orientation for correct reinstallation.
Tip: Have your drain pan positioned underneath. Even after draining, some coolant will spill when you remove the housing—this is normal but messy.
Step 3: Remove the Old Thermostat
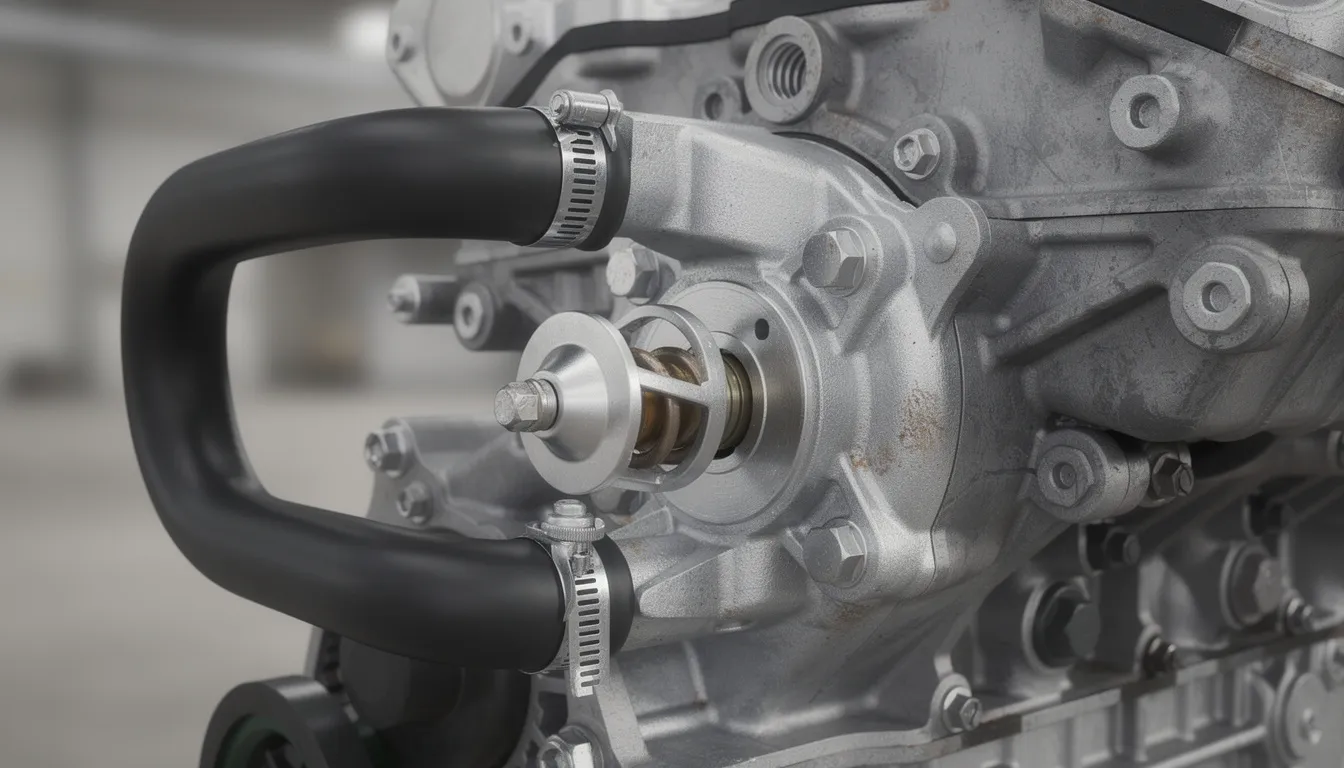
The old thermostat sits in a recessed area of the aluminum housing chunk, held in place by the gasket. It should pop out easily without twisting. Pay close attention to how it's oriented—the spring side typically faces toward the engine block. Note whether your model uses a separate paper gasket or an integrated rubber seal.
Step 4: Clean All Mating Surfaces
This step is critical for a leak-free installation. Use a plastic or brass scraper to remove all old gasket material from both the housing and the engine mating surface. Wipe clean with solvent and a shop rag. Inspect for pitting, corrosion, or damage that could prevent proper sealing. A few minutes of careful cleaning here prevents coolant leaks later.
Step 5: Install the New Thermostat
Place your new thermostat (6653948 or equivalent) in the same orientation as the original. If your thermostat has a jiggle pin or air-bleed notch, position it at the highest point to help purge air from the system during refilling. The spring side goes toward the engine block.
Step 6: Install New Gasket and Housing
Position the new OEM-style gasket or O-ring. Some technicians recommend a light coating of high-temp silicone sealant—but only if your service manual allows it for your specific model. If using sealant, allow it to set up slightly before final assembly.
Reinstall the housing and hand-start all bolts before tightening. Torque housing bolts to manufacturer specifications using a torque wrench, tightening in a crisscross pattern to avoid warping the aluminum housing. Over-torquing can strip threads or crack the housing, so easy does it—most specifications are in the 10-15 ft-lb range.
Step 7: Reinstall Hoses and Check Clamps
Reattach the upper radiator hose and any bypass hose that connects to the housing rear. Inspect all hose clamps for corrosion or weakness and replace as needed. Ensure all hoses are routed away from moving belts, pulleys, and hot exhaust components.
Refilling, Bleeding, and Verifying Proper Operation
Improper refilling can trap air pockets in the cooling system, causing false overheating readings or erratic gauge behavior even with a new thermostat. Take your time with this step.
Refilling the System
Use the correct coolant mixture—typically a 50/50 blend of heavy-duty diesel coolant and distilled water, or a premixed product that meets Bobcat specifications. Add coolant slowly through the radiator filler neck, allowing air to escape. Fill the expansion tank/reservoir to the proper level as well.
Bleeding Air from the System
- Leave the radiator cap off or in the first detent position
- Start the engine and let it idle
- Run until the upper radiator hose becomes warm to the touch--this means the thermostat has opened
- Watch the coolant level and top off as air bubbles purge
- Some technicians recommend using a funnel extension on the reservoir hose, holding it elevated to help air escape
Verification
Monitor the temperature gauge during warm-up. It should climb steadily into the normal operating range without spiking. Check for leaks at:
- Thermostat housing and gasket
- Upper and lower radiator hose connections
- Drain cock or where you disconnected the lower hose
- Water pump weep hole
After reaching operating temperature, shut down the engine and let it cool completely. Recheck coolant levels in both the radiator and reservoir before returning the machine to regular service. Top off as needed—coolant levels often drop slightly after the first heat cycle as remaining air works its way out.
Troubleshooting After Thermostat Replacement
If overheating or cold-running issues continue after fitting a new 71°C thermostat, additional components likely need attention. Don't assume the new part is defective without further investigation.
Verify Gauge and Sender Accuracy
A faulty temperature gauge or sender unit can falsely indicate overheating when the engine is actually running fine. Before assuming engine damage or continued thermostat problems, test the gauge and sender. You can use a known-good sender or an infrared thermometer on the engine block to compare actual temperature to gauge readings.
Inspect Radiator Fins
Use a trouble light or flashlight in a dark shop to shine through the radiator fins from the fan side. Look for dark, blocked sections where dirt, chaff, or mud prevents airflow. Construction and agricultural environments are especially tough on radiators. A lot of operators underestimate how much debris accumulates in a single season.
Compressed air or a pressure washer (used carefully from the engine side out) can clean external blockages. However, internal radiator corrosion and scaled flues can severely reduce flow even when outer fins look clean—this often requires removing the radiator for professional rod-out or re-core service.
Check the Water Pump
Inspect the water pump for:
- Coolant weeping from the weep hole (indicates seal failure)
- Bearing play or noise
- Impeller damage (requires removal to inspect)
A worn water pump can't circulate coolant effectively, causing overheating even with a perfectly good thermostat.
Inspect Belts and Fan Components
Verify the drive belt is correctly tensioned and not slipping under load. A glazed or cracked belt loses grip and reduces pump and fan speed. On some Bobcat Toolcat and loader models built around 2014–2018, electric cooling fans and their relays can fail or run intermittently, causing overheating at low speeds even with a good thermostat and working pump.
Document Everything
Keep records of what you've replaced, when, and at what machine hours. This experience helps with future troubleshooting and lets you identify patterns if problems recur. Share this information with your dealer or shop if you need to contact them for further diagnosis.
FAQ
Q1: How do I confirm the correct thermostat part number for my Bobcat?
A1: The safest method is to record your exact model (S150, T190, 325, Toolcat 5600, etc.) and the full serial number from your machine's ID plate, then reference the Bobcat Online Parts Catalog. The catalog shows the current thermostat part number for your specific serial range—whether that's 6653948, a superseding number like 6674172, or another option—along with the correct housing gasket or O-ring. As a final check, compare the shape, diameter, and temperature rating (71°C / 160°F) of the new thermostat with the old one before installation. This way you can be confident you purchased and are installing the right product.
Q2: Can I run my Bobcat without a thermostat temporarily?
A2: Operating without a thermostat is not recommend except for very short diagnostic tests, because the engine will typically run too cool and may never reach designed operating temperature. Prolonged use without a thermostat causes poor fuel burn, higher soot buildup in the exhaust system, reduced power, and potential long-term engine wear. If overheating disappears when the thermostat is removed, it strongly suggests a restriction or wrong-spec thermostat was installed. The permanent solution is to install the correct 71°C / 160°F unit—not to leave it out. Some operators hope running without one solves the problem, but this approach creates new issues and isn't a viable long-term fix.
Q3: How often should a Bobcat thermostat be replaced?
A3: Thermostats aren't typically a fixed-interval maintenance item driven by hours or years alone. However, many fleet managers choose to replace them preventively every 5–7 years or when performing major cooling system work. Industry experience suggests thermostats commonly fail after 1,000–2,000 hours in dusty construction environments. You should also replace the thermostat any time the housing is removed for other repairs, when coolant is badly contaminated, or when there's evidence of sticking, corrosion, or erratic temperature behavior. Recording the replacement date and machine hours makes future troubleshooting and maintenance planning much easier.
Q4: What coolant should I use after thermostat replacement?
A4: Use a heavy-duty coolant that meets Bobcat's published specifications for your particular engine family. This is typically an ethylene glycol-based, low-silicate formula with the proper additive package for diesel engines. Mixing incompatible coolant types or adding only water increases corrosion risk and can alter the thermostat's effective operating conditions. Check your owner's or service munual for exact coolant type, capacity, and service interval. If using concentrate rather than premix, always use distilled water--tap water contains minerals that can cause scale buildup and accelerate corrosion. For more information about the coolant reservoir and its importance in your vehicle's cooling system, see this detailed guide.
Q5: Is a 160℉ thermostat too cool for winter operation?
A5: Bobcat designs its cooling systems and fuel mapping around the specified 71°C / 160°F thermostat, and this rating is generally appropriate year-round—including winter—when the cooling system and cab heater are functioning properly. Installing a significantly cooler or hotter aftermarket thermostat without confirming compatibility can disrupt emissions performance, fuel economy, and cab heat output. If your machine struggles to warm up even in medium cold conditions with the correct thermostat, first check for a stuck-open thermostat, missing radiator shutters or winter covers, and excessively cold intake air before considering any change to thermostat rating. These simple things are usually the real culprit, not the thermostat specification itself.
Recommended Thermostats at Fab Heavy Parts
1.

Part Number: 7256770, 300738-00129, 30073800129
Condition: new, aftermarket
Application: The Thermostat Assembly fits for Engine: Doosan D24 and D34; Aftermarket Replacement For Bobcat Models: Excavators: E32, E35, E42, E45, E50, E55, E85; Skid Steers: S450, S510, S530, S550, S570, S590, S595, S630, S650, S740, S750, S770, S850; Tool Cat Machines: 5600, 5610; All Wheel Loader: A770; Versa Handlers: V519, V723; Compact Track Loaders: T450, T550, T590, T595, T630, T650; Doosan Forklift Models: D15S, D18S, D20C, D20SD25S, D30S, D33S, D35S, D40S, D45S, D50C, D55C, D60C, D70C, D80S, D90S; Doosan Tow Compressor: P185 with Doosan Engine
**Fab Heavy Parts is an independent reseller and it is not affiliated with any compact equipment manufacturer.
2.

Thermostat 247-7133 2477133 Fits for Caterpillar Engine C9 C12 C15 C18 3176B 3196 3306 3408
Part Number: 247-7133, CA2477133, 2477133
Application: The Thermostat fits for Caterpillar Engine: 1673C, 3126B, 3176, 3176B, 3176C, 3196, 3306, 3306B, 3306C, 3406B, 3406C, 3406E, 3408, 3408B,3456, 3606, 3608, 3612; Caterpillar Generator: SR4, SR4B, SR4BHV, C175-16, C175-20, CG137-08, CG137-12, CPT372, D250GC, D300GC, D350GC,D400GC, D450GC, D500GC, D550GC, D600 GC, DE450GC, DE450SGC, DE500GC, DE500SGC, DE550GC,DE600SGC, DE605GC, DE660GC, DE715GC, DG500, G3412C, LC51XX, SBF214, SUF557, XQG400, XQP300,XQP500; Caterpillar Challenger: MT835, MT845, MT855, MT865, MTC835, MTC845, MTC855, MTC865, 65E, 75C, 75D, 75E, 85C, 85D, 85E, 95E...
3.

New Yanmar 4TNV94 4TNV98 4TNE94 4TNE98 4D94 Engine Thermostat
Condition: new, aftermarket
The Thermostat fits for Yanmar engine 4TNV94 4TNV98 4TNE94 4TNE98 4D94
*It comes with a gasket.
4.

Fit Komatsu 4D102 Engine Thermostat
5.

82°C Thermostat 8149182 814-9182 11000237 For Volvo Penta D4 D6 Series D4-180I-B D6-330I-C
Part Number: 8149182 1544683 1676306 11000237
Other Part Numbers: MAN 51064010045 DAF 2027000 DAF 1439844 DAF 1661277 DAF 1303061 DAF 1684900 IVECO 12276553 VOLVO 8149182 VOLVO 1676306 VOLVO 1544683 VOLVO 15446834 VOLVO 11000237
Application: The Thermostat fits for Volvo Trucks TD61, TD63, TD70F, TD70FC, TD70FS, TD71, TD73, TD101, TD102, TD103, TD121, TD12 2, TD123, D6A, D7A, D7B , D10A; For Volvo Off Road 5350, 4600B, A20, A20C, A25, A25B, A25C, A25D, A30, A30C, A30D, A35, A35C, A35D, A35E, A40, A40D, EC200 EC200, EC230B, EC230B , EC280, EC300 , EC330B, EC330C, EC340, EC360B, EC360C, EC390, EC420, EC450, EC450, EC460C, EC620 ,EC650, EC650 , EW200,EW200, EW230B, EW230B, L70B, L70C , L70D, L90, L90B, L90C, L90D, L120, L120B, L120C, L120D, L150, L150C, L150D, L150E, L150F, L160, L180, L180C, L180D, L180E,L180F,L220D, L220 E, L220F, L330C,L330D , L330E...
6.

FAB Heavy Parts: Your Trusted Engine Parts Supplier
Welcome to Fab Heavy Parts' online catalog, your trusted source for quality auto parts and tools. Explore our extensive selection of Thermostats and more. Avoid delays by securing the parts you need from a reliable supplier who keeps inventory moving. Our expert team is here to provide personalized support, ensuring you get the right parts. Reach out today to stay ahead and keep your operations seamless!